

Sharpness in Landscape Photography: It’s Not Just About Focus
Sharpness is one of those things photographers talk about constantly, yet it’s often misunderstood. Many people assume sharpness simply means nailing focus. And yes, getting focus right obviously matters. But sharp landscape images are rarely the result of a single decision.
What most photographers are really trying to achieve is consistent sharpness across the frame without sacrificing image quality elsewhere. Sharp foregrounds, clean mid-tones, detailed highlights, and shadows that hold together without introducing noise.
You can do everything ‘right’, focus carefully, use a tripod, choose a sensible aperture, and still come home with images that aren’t quite sharp once you start inspecting them closely. Why?
The reason is simple. Sharpness isn’t created by one setting or one technique. It’s the result of a series of small, deliberate choices working together. Some of them are obvious. Others are easy to overlook. Once you understand how to achieve sharp images in landscape photography, the process becomes far more repeatable, something you control rather than something you hope for.
Controlling the Basics
Before we talk about focus points, apertures, or depth of field, we need to talk about control.
When it comes to sharpness, you want to be unapologetically bossy with your camera. You don’t want it guessing, or trying to be clever. You want it doing exactly what it’s told. Even the most modern cameras still benefit from being kept on a short leash.
That starts with file quality.
If you want maximum sharpness, you need maximum data. That means shooting in RAW. JPEG files are compressed, with some processing applied in-camera. With RAW files, nothing is baked in. You keep everything the sensor captured, which matters the moment you start working with a file in post-processing.
Wherever possible, use your camera’s base ISO, typically ISO 100. Some cameras offer ISO 50, but this isn’t a true native ISO. It behaves more like a digital ND filter, pulling exposure down electronically. That can be useful for slowing the shutter speed, but it may come at the cost of lost highlight detail. If you use ISO values below base ISO, do it deliberately, for creative intent rather than as your default.
Stability: The Hidden Killer of Sharp Images
Camera movement is one of the most common reasons images lack sharpness. It’s also one of the most underestimated, especially when shooting on a tripod.
A tripod is the foundation of sharp landscape photography, but simply mounting the camera isn’t enough.
Pressing the shutter button introduces movement. That small physical interaction can create vibration. The simplest solution is to use a remote shutter release or your camera’s self-timer. A two-second timer is usually enough to allow vibrations to settle. If you’re using a longer focal length, increase the delay. Rule of thumb: the longer the focal length, the longer it takes for vibrations to disappear.
100% crop at 400mm.
Both images were taken on a tripod. The only difference was using a 10-second self-timer. Small vibrations aren’t always visible until you look closely.
It may seem counterintuitive, but when your camera is on a tripod, image stabilisation should generally be turned off. The system is designed to correct hand movement. When there’s nothing to correct, it can introduce movement of its own. In windy conditions, leaving stabilisation on can sometimes help. But, if it’s that windy, hand-holding with a faster shutter speed may be the better option.
When wind is a factor, position your camera as close as possible to the tripod’s centre of gravity. Shorten the legs, widen the stance, and lower the camera closer to the ground. Stability improves dramatically when everything is closer to the ground.
Pay attention to what you’re standing on as well. Soft sand, mud, boardwalks, piers, and footbridges all transmit movement. If you’re on a beach, push the tripod legs further into the sand. If you’re on a wooden structure, stop moving while the exposure is being made. Vibrations underfoot travel surprisingly well.
If you’re using a DSLR, mirror lock-up is worth enabling. When the mirror flips up just before the exposure, it can create noticeable vibration, particularly at slower shutter speeds. Mirror lock-up raises the mirror first, then waits before taking the photo. Combined with a self-timer, this allows everything to settle properly. On mirrorless cameras, silent shooting or electronic shutter modes achieve a similar result by removing mechanical movement altogether.
Aperture, Sweet Spots, and Why Smaller Isn’t Always Sharper
Every lens has a specific aperture where it performs at its best. This is commonly referred to as the lens’s sweet spot, usually one to two stops down from wide open. For most full frame lenses, that often falls around f8 or f11. On APS-C cameras, it’s typically closer to f5.6 or f8.
This is the aperture where a lens produces its sharpest results overall. If your goal is maximum image quality, this is the f-stop you want to prioritise whenever possible. Every lens has its own sweet spot. The most accurate way to find yours is to photograph the same scene at different apertures and inspect the results on your computer. If you’d rather save some time, lab-tested results for many lenses are available on opticallimits.com.
There’s a belief that stopping right down and shooting at the lens’s narrowest aperture ensures everything is sharp from front to back. While a narrower aperture does increase depth of field, in practice that isn’t quite how it works. The reason is physics, not focus.
Diffraction occurs when light is forced through a very small opening and begins to scatter. This happens at all apertures to some degree, but the effect becomes far more pronounced as you stop down to very narrow apertures.
In simple terms, stopping down gives you more of the scene in focus, but at the cost of overall resolution, often most noticeably toward the edges of the frame. That’s why very narrow apertures such as f22 should be used deliberately, for example if you need to force a slower shutter speed. If you do end up using a very narrow aperture, it can be beneficial to take an additional exposure of the same scene at a wider aperture and blend the sharper areas later in post-processing.
The Housekeeping Details Everyone Forgets
Dirty filters, salty sea spray, dust on lenses, or a dirty sensor can all compromise image quality. Mirrorless cameras are particularly prone to sensor dust. If you notice dust spots, try running the camera’s sensor cleaning mode first. If that doesn’t work, a proper sensor swab is unavoidable.
Another often-overlooked culprit is the diopter. If autofocus suddenly feels unreliable, or nothing seems quite sharp through the viewfinder, check the diopter adjustment on your EVF. They’re easily knocked when pulling the camera in and out of your bag. I’ve been caught by this more times than I care to admit.
Before assuming your technique is failing, check the basics.
Choosing the Right Focusing Method for the Scene
Modern cameras give us plenty of ways to focus, which sounds helpful until you’re standing in the field wondering which one to use. Autofocus or manual focus. Single point or something more automated. Which is actually best for landscape photography?
The short answer is that all focusing modes have their place across different genres of photography. But for the vast majority of my landscape work, the method I rely on and the one that gives me the most control is Flexible Spot focusing. It allows me to place the focus point exactly where I want it in the scene, rather than letting the camera decide what it thinks is important.
I pair Flexible Spot focusing with autofocus rather than manual focus. As much as I like to think otherwise, my eyes aren’t what they used to be, and in many situations I trust autofocus more than I trust my eyesight. I tend to switch to manual focus only in very low light, when the camera struggles to lock on.
When I’m using autofocus, I set the camera to AF-S, single-shot autofocus. Combined with Flexible Spot, this stops the camera from continuing to hunt once focus has been set and lets me be precise about what I’m focusing on.
To check accuracy, I position the focus point on the chosen element, enlarge the image on the rear LCD, and then focus. I use back button focus so that once focus is set, it doesn’t change between frames. In very low light, it can be difficult to judge focus. In those situations, I’ll temporarily increase the exposure so I can see the details clearly, then return to my intended exposure before taking the shot.
Back button focus does exactly what it sounds like. By removing focus from the shutter button and assigning it to a button on the back of the camera, you prevent the camera from refocusing every time you press the shutter. Each camera brand handles this slightly differently, so it’s worth looking up instructions for your specific model.
Where to Focus in Landscape Scenes
Getting sharpness isn’t just about how you focus, but where you place that focus.
You’ve probably heard of hyperfocal distance. And if you’ve quietly filed it in the “too hard” basket, you’re not alone. The good news is you don’t need to master the maths to get sharp images. Don’t worry, this isn’t turning into a science lesson.
In large, open landscapes, it helps to think about the scene in terms of visual layers rather than physical distance. Most compositions naturally break down into a foreground, a midground, and a background. Start by identifying the furthest layer in the frame that you want to appear sharp. Instead of focusing on that layer itself, place your focus on the layer immediately in front of it. This gives depth of field room to extend forward toward the camera and backward into the distance.
In wide landscapes, I focus into the second-to-last layer. The contrast between the dark ridge and the snow behind it created a precise edge for focus, helping depth of field extend naturally through the scene.
With more intimate compositions, the decision is often simpler. Focusing on the furthest important element is usually enough, provided the foreground isn’t extremely close. When the foreground is very close to the camera, depth of field becomes limited, even at your lens’s sweet spot. In those situations, focus stacking may be necessary.
Focus stacking is simply taking multiple images of the same scene, each focused at a different distance, and blending them later. It’s worth remembering that this process often costs you some composition, so it’s best to shoot at a slightly wider focal length to allow for cropping in post-processing. If you’re unsure how many focus points to include, take more than you think you need. You’ll never regret having extra frames. You will regret getting home and discovering softness you could have fixed on location.
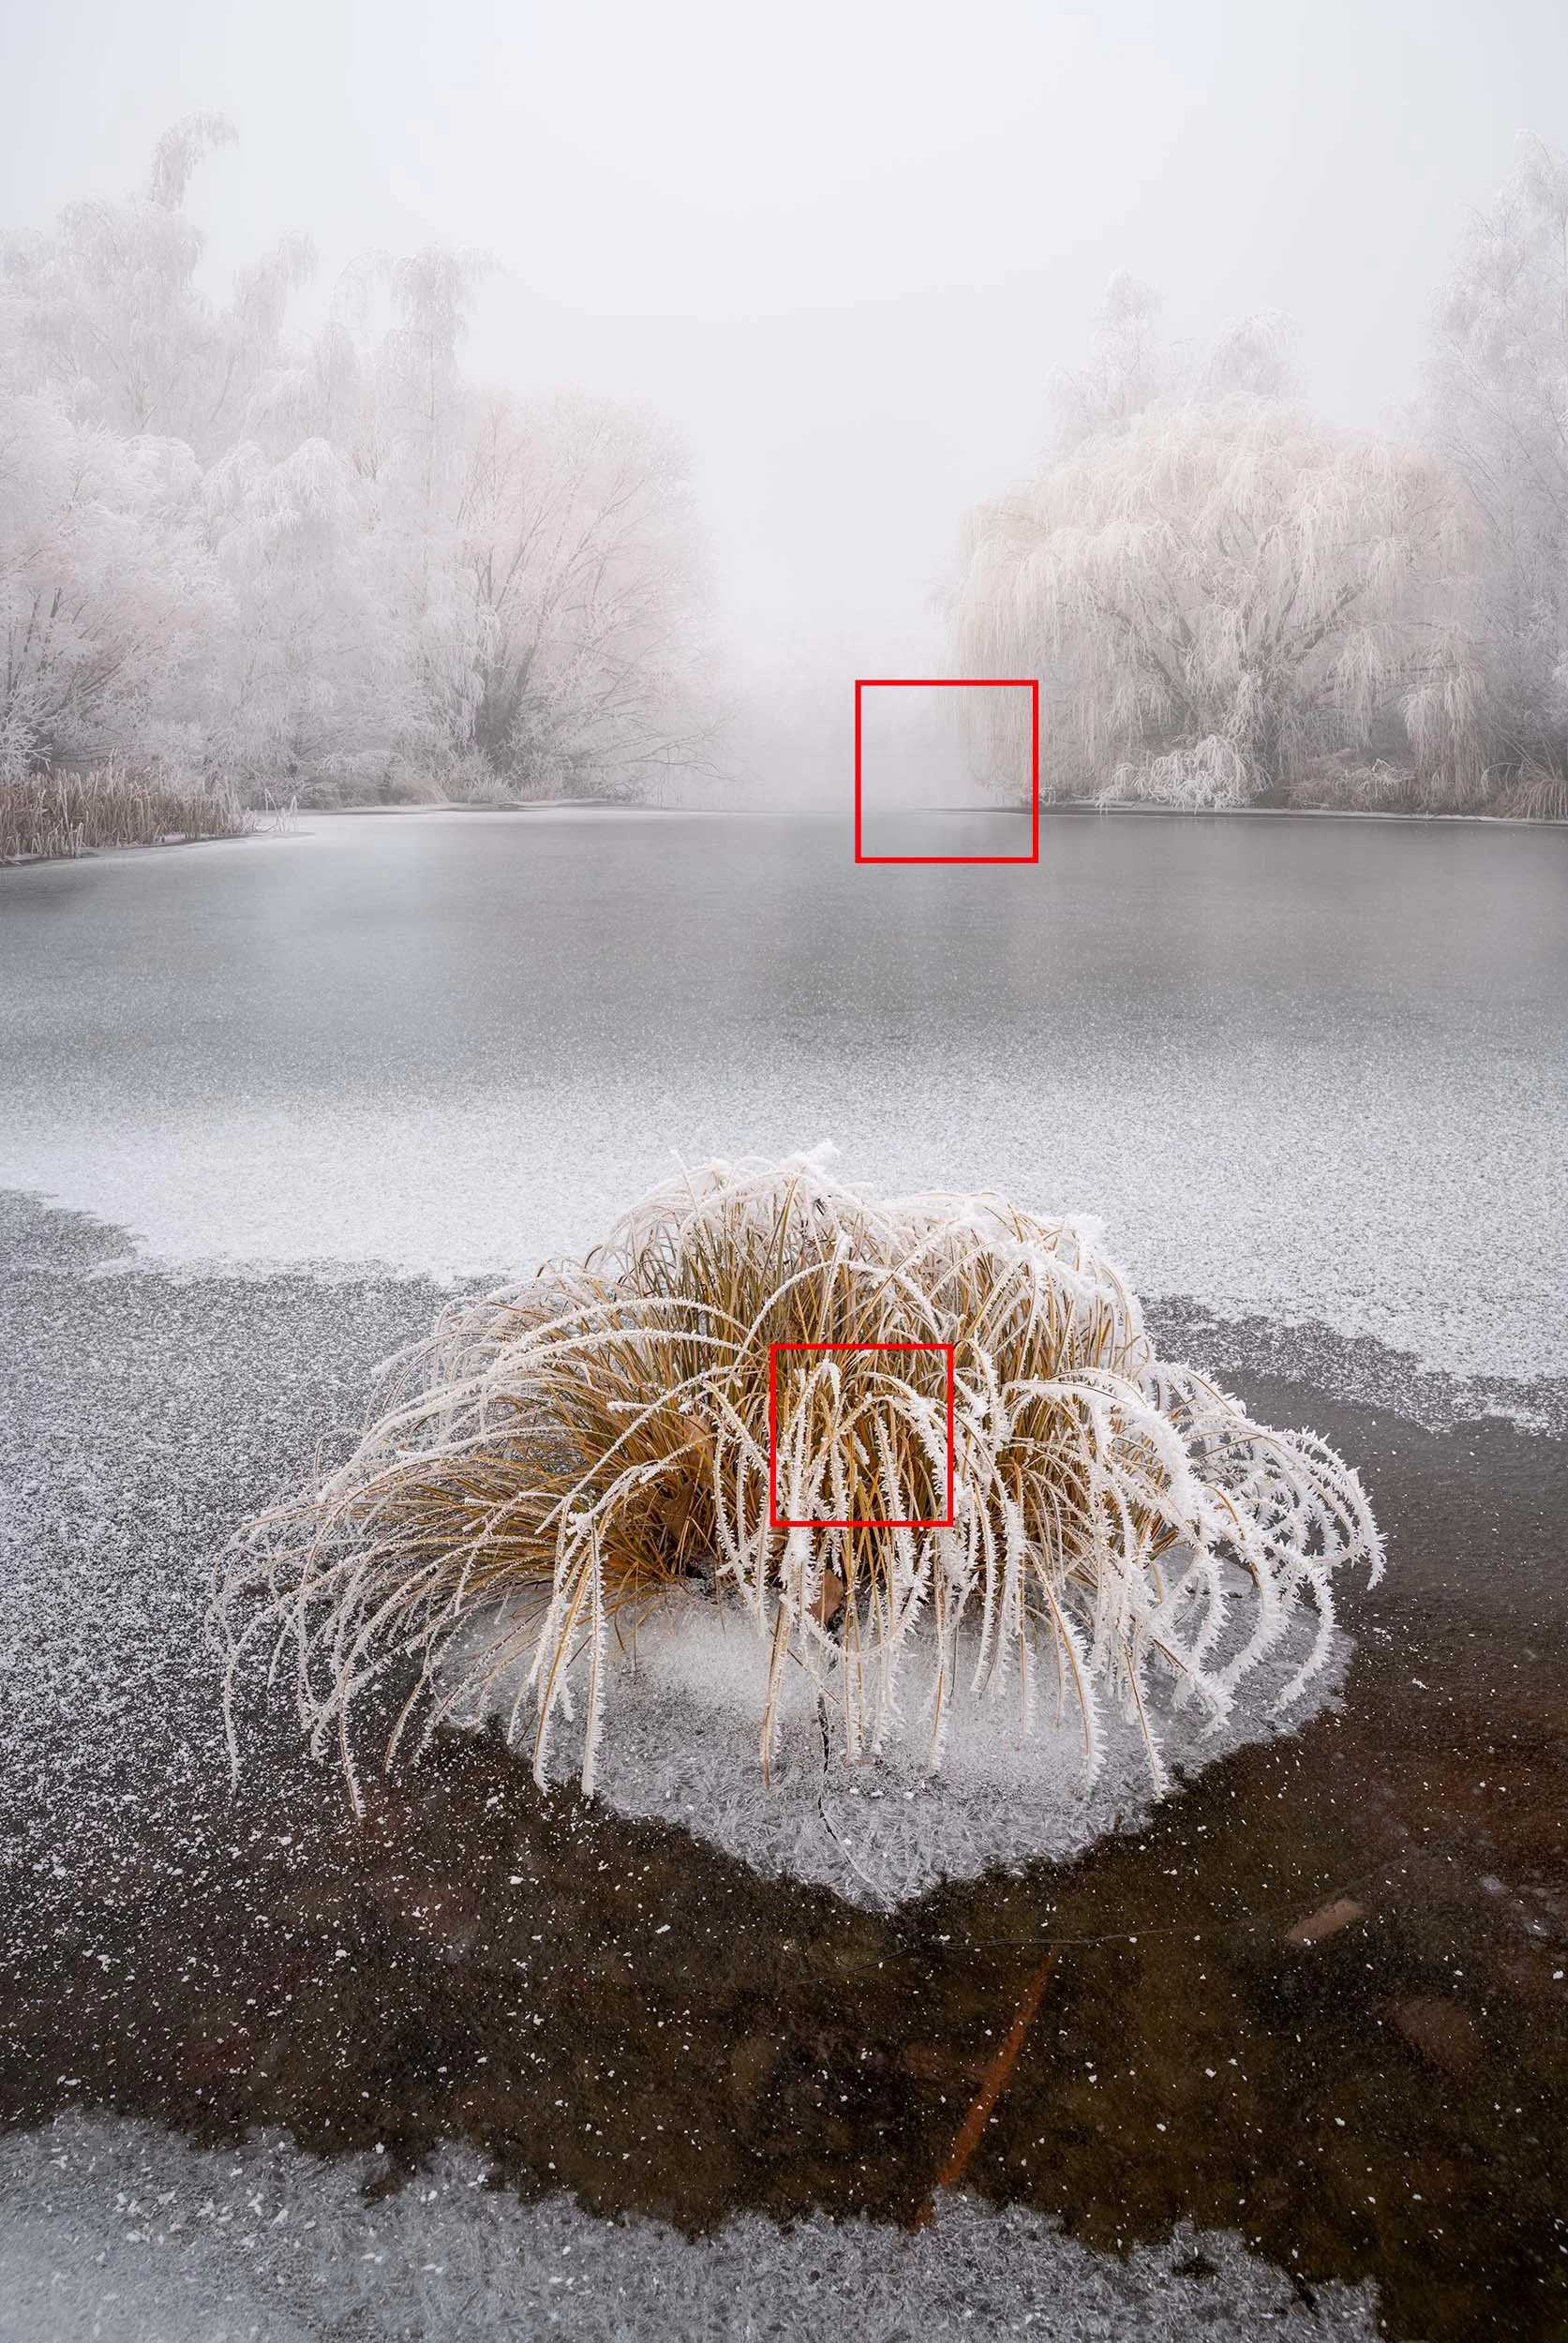
In this scene, limited visibility meant there were fewer options in the distance. I focused on the edge of the background vegetation to create a clean transition, then stacked frames to maintain sharp detail from the frost in the foreground through to the trees behind.
When You’re Shooting Hand-Held
Hand-held shooting follows a different set of rules.
Shutter speed becomes critical. A simple guideline is the reciprocal rule: use a shutter speed equal to or faster than the focal length you’re using. For example, at 200mm, aim for at least 1/200. On APS-C cameras, multiply the focal length by 1.5 or even 2 to be safe. If there isn’t an exact shutter speed match, choose the next fastest option.
This rule is based on the focal length you’re using, not the maximum focal length of the lens.
When shooting hand-held, image stabilisation should be turned on and the self-timer turned off. Good posture also helps. Tuck your elbows in, use the viewfinder rather than the rear screen, breathe out gently, and press the shutter smoothly. Shooting short bursts can also increase your chances of capturing a sharp frame.
Check Your Sharpness Before Moving
Before you move the camera or change your setup, take a moment to check your images properly. Zoom in on the rear screen and inspect the critical areas. It’s far easier to correct focus, while everything is still in place rather than discover problems once you’re home.
Sharp landscape photography isn’t about perfection or expensive gear. It comes down to a series of deliberate choices made in the field, and the discipline to check that those choices worked. When you slow down and take control of the process, sharpness stops feeling accidental and starts becoming reliable

About Erin
I’m Erin, an award-winning landscape photographer from New Zealand. Most mornings you’ll find me somewhere cold, usually with a coffee in hand, waiting to see what the light does.
I run small, immersive workshops for photographers who want time to explore, experiment, and really pay attention to the landscape around them. Everything’s organised, so the focus stays on the experience and the photography.
My motto is to explore the extraordinary & expect the unexpected.